Printers: Difference between revisions
No edit summary |
Tag: Manual revert |
||
| (106 intermediate revisions by 8 users not shown) | |||
| Line 1: | Line 1: | ||
= | = Before You Begin = | ||
Printing costs account for a large portion of SIAT's operating expenses so please use the printers judiciously. If the printer supports it, use its double-sided (also known as "duplex") printing option. Colour prints cost more than black-and-white prints, so please print as black-and-white whenever possible. | |||
<br /><br /> | |||
= Printer Features = | |||
== Ricoh Printers == | |||
As of September 2018, SIAT has transitioned to Ricoh printers. These printers feature b+w and colour capabilities, along with scanning, faxing, printing and copying. Print jobs are sent to a central queue and only sent to a printer when the user goes to it and releases her print job. This will reduce the number of wrong, wasted or forgotten prints. This also secures all print jobs and ensures that only the user sees the documents that she is printing. | |||
'''IMPORTANT: in order to use these printers, you must first register your student card or fob on one of the printers (doesn't matter which one). Instructions for doing so can be found here: [[https://www.sfu.ca/information-systems/services/sfu-print/SFU-print-how-to-guides/set-up-sfu-print.html https://www.sfu.ca/information-systems/services/sfu-print/SFU-print-how-to-guides/set-up-sfu-print.html]].''' | |||
== HP Designjet 800ps == | |||
Located in room 3700, near the SIAT mailboxes. This is a large format inkjet printer that uses 42" wide roll paper. Its primary use is for producing posters for display purposes. This printer is not connected to the network, and can only be used by logging onto the computer located next to it. Before using this printer, please read the information on this page: [[Using the Large Format Printer and Scanning PC]] | |||
<br /><br /> | |||
= Installing a Printer = | |||
In case a printer has not been installed on your workstation, here is a handy reference to install a Research printer under Windows, Mac, or Linux. | |||
If you have a Mac or Linux machine with an automatic DNS discovery tool, such as Bonjour, Avahi, or Zeroconf, you can browse the network for these printers to add them. The printers will show up with a name listed below (like sr-isoroku); further details in each operating system section. | |||
== Ricoh Printers == | |||
A complete set of installation instructions and printer/copier operation guides can be found here: [https://www.sfu.ca/itservices/technical/sfu-print/how-to-guides/ https://www.sfu.ca/itservices/technical/sfu-print/how-to-guides/] | |||
<br /><br /> | |||
'''NOTE: Windows Users'''<br /> | |||
You may encounter an issue when following the directions where you cannot connect to the network file share, and see a message that says something to the effect of:<br /> | |||
''You can’t access this shared folder because your organization’s security policies block unauthenticated guest access''<br /> | |||
The problem is caused by a Windows default security setting. | |||
<br /><br /> | |||
To fix this, follow these steps:<br /> | |||
# Open the '''Run''' window '''(Win + R)''' and typed '''gpedit.msc''' to open the Local Group Policy Editor. | |||
[[File:Ricoh-fileserver-access-01.jpg| ]] | |||
# Navigate to '''Computer Configuration -> Administrative Templates -> Network -> Lanman Workstation''' and select the '''Enable insecure guest logons''' as shown in the below screenshot. | |||
[[File:Ricoh-fileserver-access-02.jpg| ]] | |||
# Change its value to '''Enabled''', then click on '''OK'''. You should now be able to connect to the network file share. | |||
[[File:Ricoh-fileserver-access-04.jpg| ]] | |||
== Other Printers == | |||
For all other printers, please use the following directions: | |||
# To install a new printer, find out which printers are closest to you and note the printer's hostname, such as sr-isoroku.iat.sfu.ca. You can find a complete list below. | |||
# Follow the guide below for your operating system to add the printer: | |||
::* [[HOWTO Install Printers Under Windows|Install Printers Under Windows]] | |||
::* [[HOWTO Install Printers Under Mac OSX|Install Printers Under Mac OSX]] | |||
::* [[HOWTO Install Printers Under Linux|Install Printers Under Linux]] | |||
== Research Printers == | |||
[[image:printers-siat-floor-plan-4.png|right]] | |||
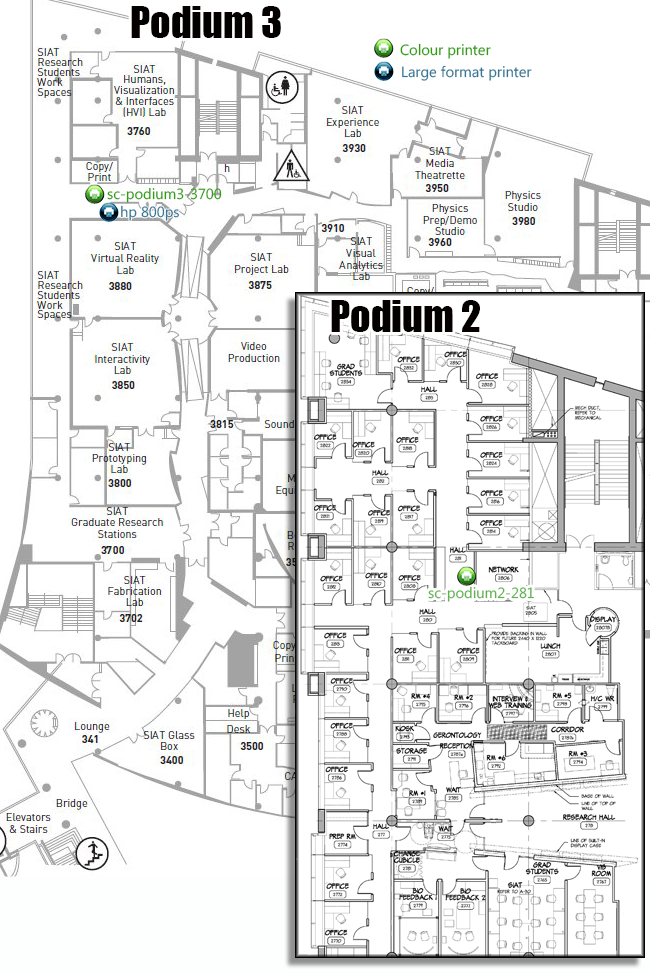
* sc-podium3-3700 [[http://support.ricoh.com/bb_v1oi/pub_e/oi_view/0001069/0001069817/view/booklist/int/index_book.htm Ricoh MP C3004ex]] | |||
* sc-podium2-281 [[http://support.ricoh.com/bb_v1oi/pub_e/oi_view/0001069/0001069817/view/booklist/int/index_book.htm Ricoh MP C3004ex]] | |||
* HP 800ps large format printer/plotter | |||
<br clear="all"> | |||
= Drivers = | |||
Follow the links below to download the printer driver you need to install on your computer: | |||
::* [[Media:Upd-5101-pcl6_winxp-vista.exe|HP '''32-bit''' Universal PS driver]] - newest! | |||
::* [[Media:Clj4600pcl6win2kxp2003-en.exe|HP '''32-bit''' driver]] - use only if Universal driver (above) doesn't work; this one is older | |||
::* [[Media:Upd_5101-ps_winxp_vista_x64.exe|HP '''64-bit''' Universal PS driver]] - tested and used for Windows 7 | |||
''' | |||
[[ | |||
Latest revision as of 17:54, 18 September 2024
Before You Begin
Printing costs account for a large portion of SIAT's operating expenses so please use the printers judiciously. If the printer supports it, use its double-sided (also known as "duplex") printing option. Colour prints cost more than black-and-white prints, so please print as black-and-white whenever possible.
Printer Features
Ricoh Printers
As of September 2018, SIAT has transitioned to Ricoh printers. These printers feature b+w and colour capabilities, along with scanning, faxing, printing and copying. Print jobs are sent to a central queue and only sent to a printer when the user goes to it and releases her print job. This will reduce the number of wrong, wasted or forgotten prints. This also secures all print jobs and ensures that only the user sees the documents that she is printing. IMPORTANT: in order to use these printers, you must first register your student card or fob on one of the printers (doesn't matter which one). Instructions for doing so can be found here: [https://www.sfu.ca/information-systems/services/sfu-print/SFU-print-how-to-guides/set-up-sfu-print.html].
HP Designjet 800ps
Located in room 3700, near the SIAT mailboxes. This is a large format inkjet printer that uses 42" wide roll paper. Its primary use is for producing posters for display purposes. This printer is not connected to the network, and can only be used by logging onto the computer located next to it. Before using this printer, please read the information on this page: Using the Large Format Printer and Scanning PC
Installing a Printer
In case a printer has not been installed on your workstation, here is a handy reference to install a Research printer under Windows, Mac, or Linux.
If you have a Mac or Linux machine with an automatic DNS discovery tool, such as Bonjour, Avahi, or Zeroconf, you can browse the network for these printers to add them. The printers will show up with a name listed below (like sr-isoroku); further details in each operating system section.
Ricoh Printers
A complete set of installation instructions and printer/copier operation guides can be found here: https://www.sfu.ca/itservices/technical/sfu-print/how-to-guides/
NOTE: Windows Users
You may encounter an issue when following the directions where you cannot connect to the network file share, and see a message that says something to the effect of:
You can’t access this shared folder because your organization’s security policies block unauthenticated guest access
The problem is caused by a Windows default security setting.
To fix this, follow these steps:
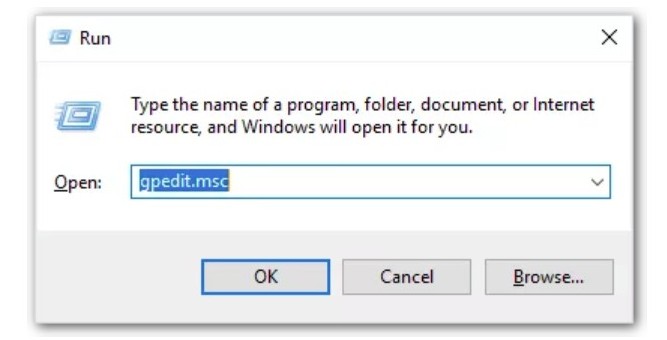
- Open the Run window (Win + R) and typed gpedit.msc to open the Local Group Policy Editor.
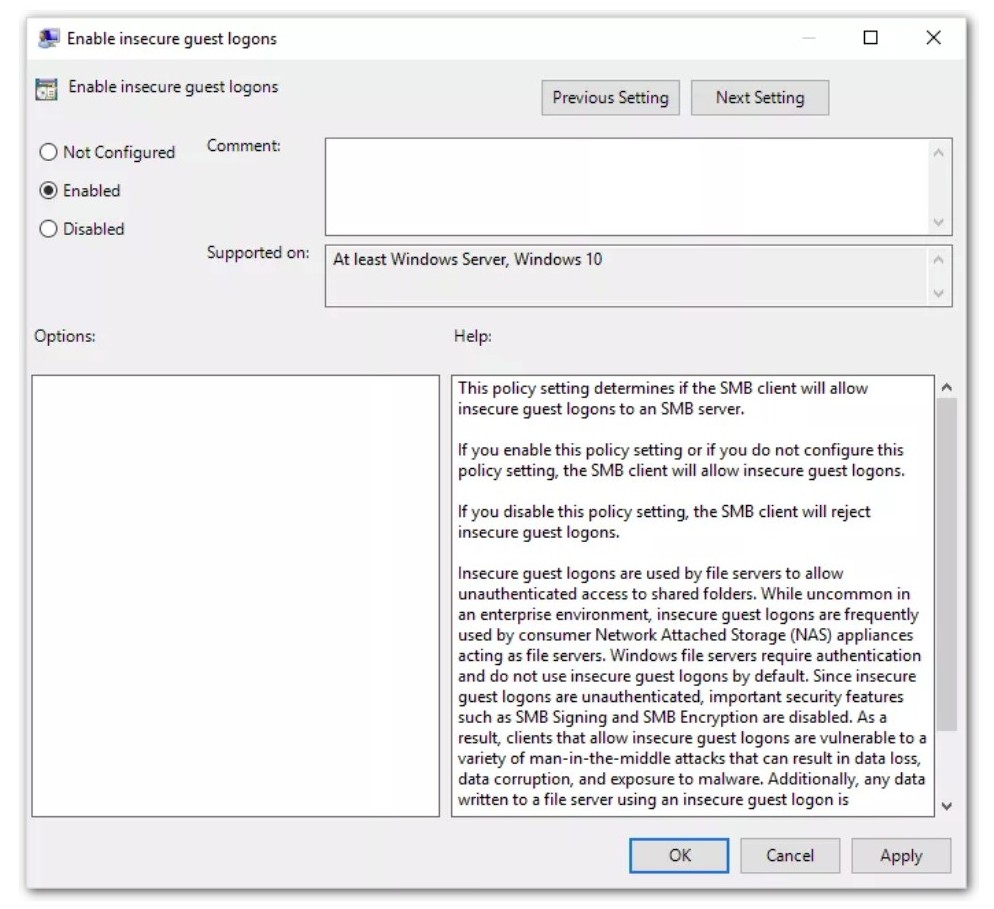
- Navigate to Computer Configuration -> Administrative Templates -> Network -> Lanman Workstation and select the Enable insecure guest logons as shown in the below screenshot.
- Change its value to Enabled, then click on OK. You should now be able to connect to the network file share.
Other Printers
For all other printers, please use the following directions:
- To install a new printer, find out which printers are closest to you and note the printer's hostname, such as sr-isoroku.iat.sfu.ca. You can find a complete list below.
- Follow the guide below for your operating system to add the printer:
Research Printers

- sc-podium3-3700 [Ricoh MP C3004ex]
- sc-podium2-281 [Ricoh MP C3004ex]
- HP 800ps large format printer/plotter
Drivers
Follow the links below to download the printer driver you need to install on your computer:
- HP 32-bit Universal PS driver - newest!
- HP 32-bit driver - use only if Universal driver (above) doesn't work; this one is older
- HP 64-bit Universal PS driver - tested and used for Windows 7


