HOWTO Install Printers Under Mac OSX: Difference between revisions
Jump to navigation
Jump to search
No edit summary |
|||
| (2 intermediate revisions by 2 users not shown) | |||
| Line 1: | Line 1: | ||
==Mac OS-X Printer Installation== | ==Mac OS-X Printer Installation== | ||
=== OS X 10.4 (see note at bottom for other versions) === | |||
=== OS X 10.4 === | |||
'''HP Colour Laserjet Printers''' | '''HP Colour Laserjet Printers''' | ||
| Line 9: | Line 7: | ||
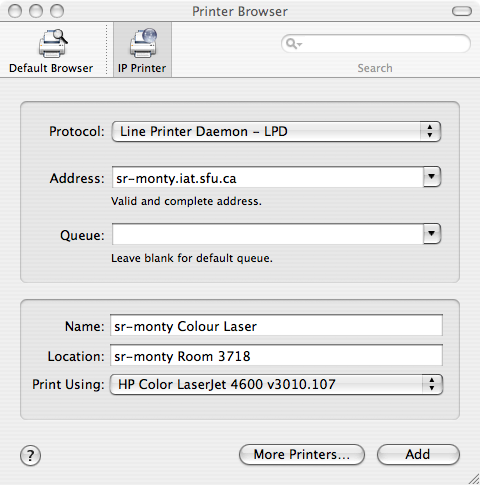
First, click an empty portion of your desktop, then click Go > Utilities. Double click the Printer Setup Utility, then hit Add. The image below should help you the rest of the way. | First, click an empty portion of your desktop, then click Go > Utilities. Double click the Printer Setup Utility, then hit Add. The image below should help you the rest of the way. | ||
[[Image: | [[Image:macprinter2.png]] | ||
| Line 16: | Line 14: | ||
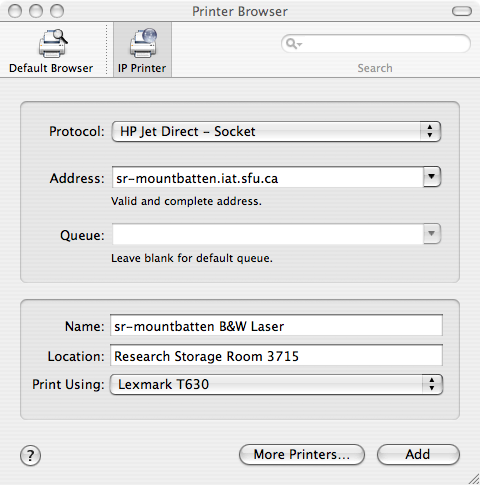
To set up a Lexmark printer, follow the same instructions as for an HP printer, except use the configuration below after clicking Add. | To set up a Lexmark printer, follow the same instructions as for an HP printer, except use the configuration below after clicking Add. | ||
[[Image: | [[Image:macprinter1.png]] | ||
<br> | |||
<br> | |||
=== Note === | |||
Newer versions of OSX have moved the printer setup into '''Print and Fax''', or something similarly named. To reach it, you need to go into '''System Preferences'''. | |||
Latest revision as of 18:55, 19 March 2013
Mac OS-X Printer Installation
OS X 10.4 (see note at bottom for other versions)
HP Colour Laserjet Printers
First, click an empty portion of your desktop, then click Go > Utilities. Double click the Printer Setup Utility, then hit Add. The image below should help you the rest of the way.
Lexmark B&W Printers
To set up a Lexmark printer, follow the same instructions as for an HP printer, except use the configuration below after clicking Add.
Note
Newer versions of OSX have moved the printer setup into Print and Fax, or something similarly named. To reach it, you need to go into System Preferences.

