HOWTO Install Printers Under Windows: Difference between revisions
No edit summary |
No edit summary |
||
| Line 1: | Line 1: | ||
==Windows Printer Installation== | ==Windows Printer Installation== | ||
<br> | <br> | ||
The following screenshots will guide you through a typical Lexmark T630 installation on a | The following screenshots will guide you through a typical Lexmark T630 installation on a Windows XP workstation. | ||
<br> | <br> | ||
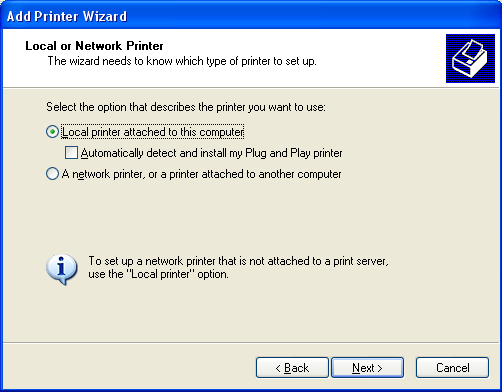
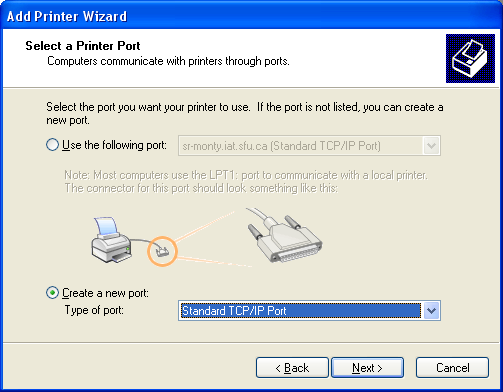
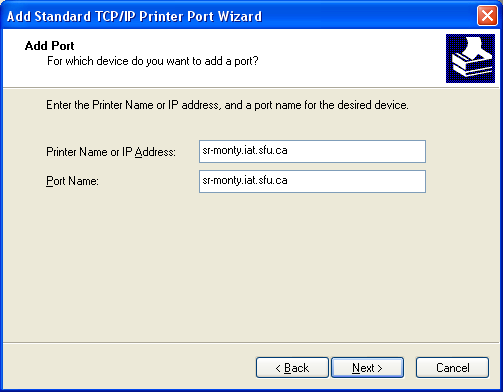
First, invoke the Add Printer Wizard | First, invoke the Add Printer Wizard. You do this by clicking Start > Printers and Faxes > Add printer (on the left). When the wizard pops up, an information screen should come up. Hit Next. The screenshots below should help you the rest of the way, but make sure you know the name of your [[Printers#Printers|desired printer]] before you go on. | ||
<br> | <br> | ||
[[Image: | [[Image:Windows1.PNG]] | ||
<br> | <br> | ||
[[Image:Windows2.PNG]] | |||
<br> | <br> | ||
[[Image: | [[Image:Windows3.PNG]] | ||
<br> | <br> | ||
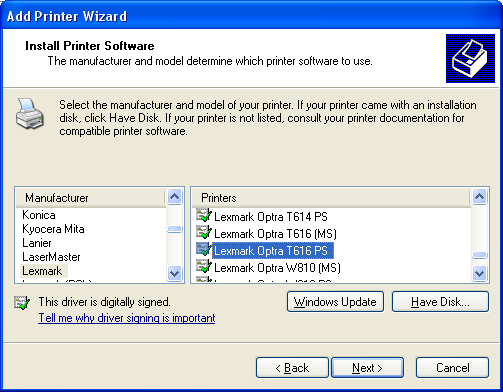
You should now be taken to the following screen, where you need to find the driver for your printer. This is the correct one for a Lexmark black and white Laserjet, scroll down for the HP Colour Laserjet settings: | |||
<br> | <br> | ||
[[Image:Windows6.PNG]] | |||
<br> | <br> | ||
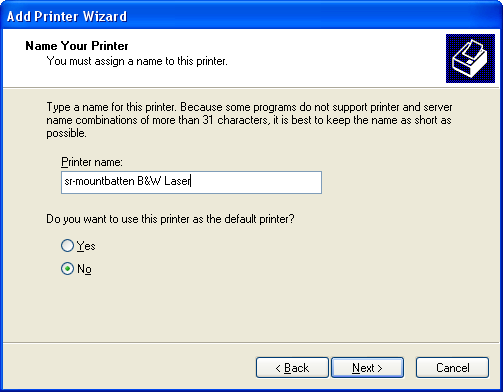
You may be asked if you would like to keep the existing driver or use the new one. Leave "Keep existing" checked. For the following screen, you will need to name the printer you have just added. Please use the following format to make it easier for anyone (including yourself) who will try to print from the workstation. | |||
<br> | <br> | ||
[[Image:Windows7.PNG]] | |||
<br> | <br> | ||
Click next for the next screen, and to save some trees, choose not to print a test page. If it's not working, ask and administrator instead! Your black and white Lexmark printer should now be set up. | |||
<br> | <br> | ||
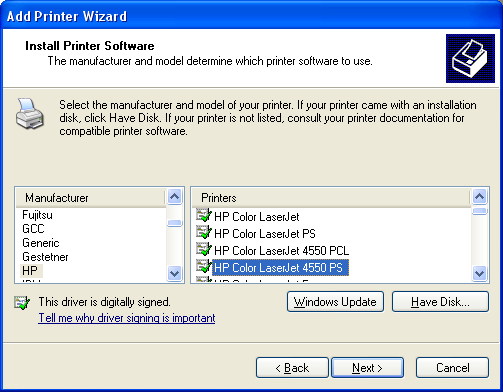
The HP4600 Colour Laserjets are very similar to the Lexmark T630 when installing, except use these settings when you reach the the following screen: | |||
<br> | <br> | ||
[[Image: | [[Image:Windows4.PNG]] | ||
<br> | <br> | ||
Make sure your HP Colour Laserjet is not set as your default printer. | |||
You should now be done installing all your printers. | |||
Revision as of 20:55, 12 September 2006
Windows Printer Installation
The following screenshots will guide you through a typical Lexmark T630 installation on a Windows XP workstation.
First, invoke the Add Printer Wizard. You do this by clicking Start > Printers and Faxes > Add printer (on the left). When the wizard pops up, an information screen should come up. Hit Next. The screenshots below should help you the rest of the way, but make sure you know the name of your desired printer before you go on.
You should now be taken to the following screen, where you need to find the driver for your printer. This is the correct one for a Lexmark black and white Laserjet, scroll down for the HP Colour Laserjet settings:
You may be asked if you would like to keep the existing driver or use the new one. Leave "Keep existing" checked. For the following screen, you will need to name the printer you have just added. Please use the following format to make it easier for anyone (including yourself) who will try to print from the workstation.
Click next for the next screen, and to save some trees, choose not to print a test page. If it's not working, ask and administrator instead! Your black and white Lexmark printer should now be set up.
The HP4600 Colour Laserjets are very similar to the Lexmark T630 when installing, except use these settings when you reach the the following screen:
Make sure your HP Colour Laserjet is not set as your default printer.
You should now be done installing all your printers.
