Konica Minolta Printer Driver - How to Install: Difference between revisions
Jump to navigation
Jump to search
(Created page with "== Obtain the Printer Driver == Download the printer driver that matches the printer and your computer's operating system: '''Konica Minolta Bizhub C364 colour multi-functio...") |
No edit summary |
||
| Line 1: | Line 1: | ||
== | == Obtaining the Printer Driver == | ||
Download the printer driver that matches the printer and your computer's operating system: | Download the printer driver .zip file that matches the printer and your computer's operating system: | ||
'''Konica Minolta Bizhub C364 colour multi-function printer''' | '''Konica Minolta Bizhub C364 colour multi-function printer''' | ||
| Line 12: | Line 12: | ||
* Mac OS X 10.6-10.8, driver version 1.5.0 [[media: KM_423_1.5.0_OSX10-6-7-8.zip]] | * Mac OS X 10.6-10.8, driver version 1.5.0 [[media: KM_423_1.5.0_OSX10-6-7-8.zip]] | ||
* Mac OS X 10.9, driver version 1.7.0 [[media: KM_423_1.7.0_OSX10-9.zip]] | * Mac OS X 10.9, driver version 1.7.0 [[media: KM_423_1.7.0_OSX10-9.zip]] | ||
<br /><br /> | |||
Once the | == Installing the Printer Driver == | ||
=== Windows === | |||
Unzip the printer driver file, go into the resulting '''Driver''' folder and run '''Setup64.exe'''. | |||
[[image:Km-driver-001.jpg|frame|Click on '''AGREE'''.|left]] | |||
[[image:Km-driver-002.jpg|frame|Select '''Install printers/MFPs''' and '''Preference for IPv4''', then click on '''Next'''.|left]] | |||
[[image:Km-driver-004.jpg|frame|When this dialog appears, you will probably have to wait for a while for it to search for available printers.<br />Once it has returned control to you, select '''Specify the Printer/MFP...(IP Adress, Host Name...''', then click on '''Refer to...''' It will take you to the '''Manual Selection''' dialog.|left]] | |||
[[image:Km-driver-003.jpg|frame|Type in the IP address of the printer you want to use. Once you've typed in the IP, click on '''OK'''.<br />When you're back at the '''Select Printer/MFP to Install''' dialog, click on '''Next'''.|left]] | |||
[[image:Km-driver-005.jpg|frame|Select the PCL driver, then click on '''Next'''.|left]] | |||
[[image:Km-driver-006.jpg|frame|Click on '''Install'''.|left]] | |||
[[image:Km-driver-007.jpg|frame|When the installation has completed, click on the '''Property''' button.|left]] | |||
[[image:Km-driver-008.jpg|frame|Click on '''Preferences...'''.|left]] | |||
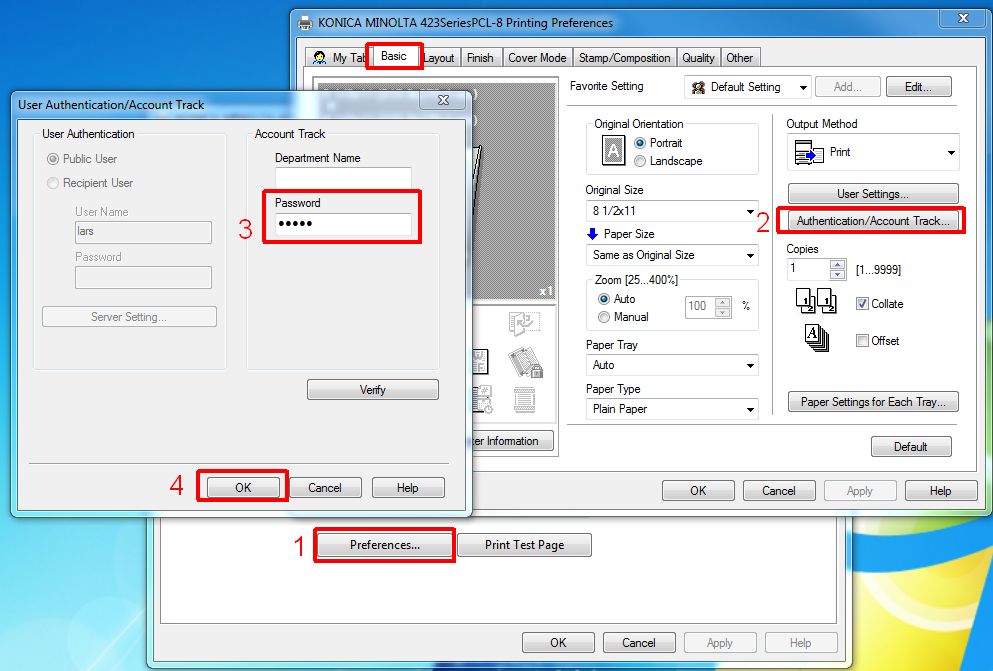
[[image:Km-driver-009.jpg|frame|On the '''Printing Preferences''' dialog, click on the '''Basic''' tab, then click on '''Authentication/Account Track...'''.<br />On the '''User Authentication/Account Track''' dialog, enter your account tracking code in the '''Password''' field, then click on '''OK'''.<br />Click '''OK''' on the subsequent dialogs, and '''Finish''' on the last dialog.|left]] | |||
Revision as of 17:28, 6 March 2014
Obtaining the Printer Driver
Download the printer driver .zip file that matches the printer and your computer's operating system:
Konica Minolta Bizhub C364 colour multi-function printer
- Windows 7 64-bit, driver version 1.2.1.0 media: KM_C364_Win_7_v1210.zip
- Mac OS X 10.6-10.8, driver version 3.0.2 media: KM_C364_3.0.2_OSX10-6-7-8.zip
- Mac OS X 10.9, driver version 4.5.2 media: KM_C364_4.5.2_OSX10-9.zip
Konica Minolta Bizhub 423 monochrome multi-function printer
- Windows 7 64-bit, driver version 1.4.0.0 media: KM_423_Win_7_v1400.zip
- Mac OS X 10.6-10.8, driver version 1.5.0 media: KM_423_1.5.0_OSX10-6-7-8.zip
- Mac OS X 10.9, driver version 1.7.0 media: KM_423_1.7.0_OSX10-9.zip
Installing the Printer Driver
Windows
Unzip the printer driver file, go into the resulting Driver folder and run Setup64.exe.

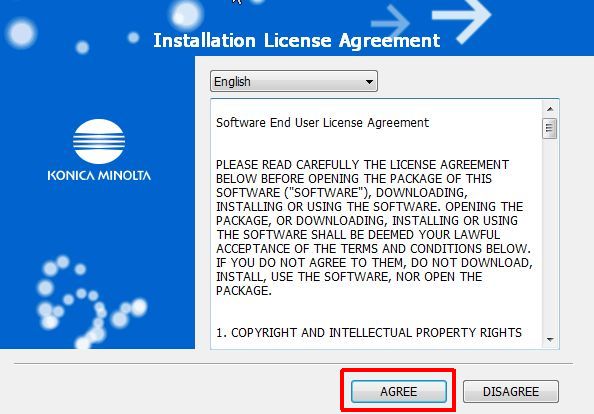
Click on AGREE.

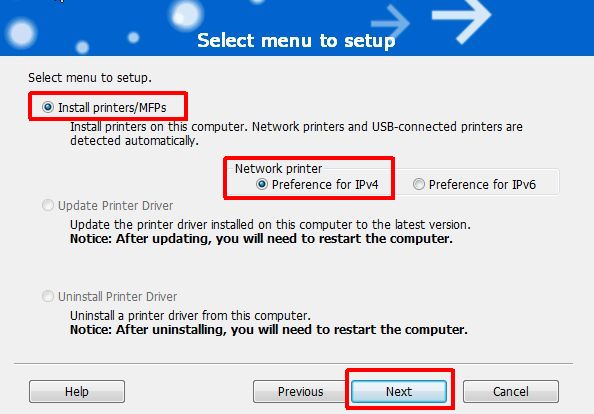
Select Install printers/MFPs and Preference for IPv4, then click on Next.

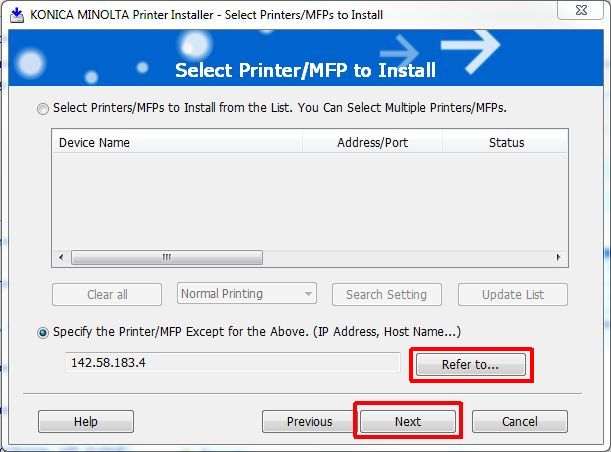
When this dialog appears, you will probably have to wait for a while for it to search for available printers.
Once it has returned control to you, select Specify the Printer/MFP...(IP Adress, Host Name..., then click on Refer to... It will take you to the Manual Selection dialog.
Once it has returned control to you, select Specify the Printer/MFP...(IP Adress, Host Name..., then click on Refer to... It will take you to the Manual Selection dialog.

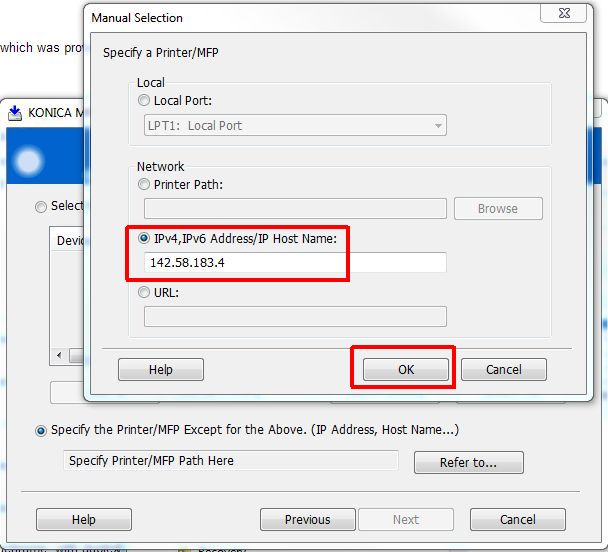
Type in the IP address of the printer you want to use. Once you've typed in the IP, click on OK.
When you're back at the Select Printer/MFP to Install dialog, click on Next.
When you're back at the Select Printer/MFP to Install dialog, click on Next.

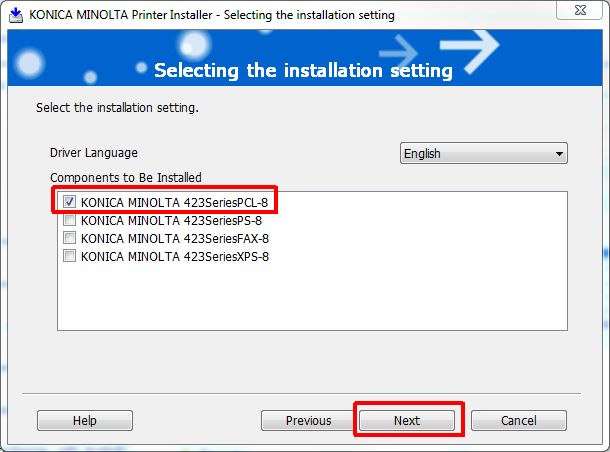
Select the PCL driver, then click on Next.

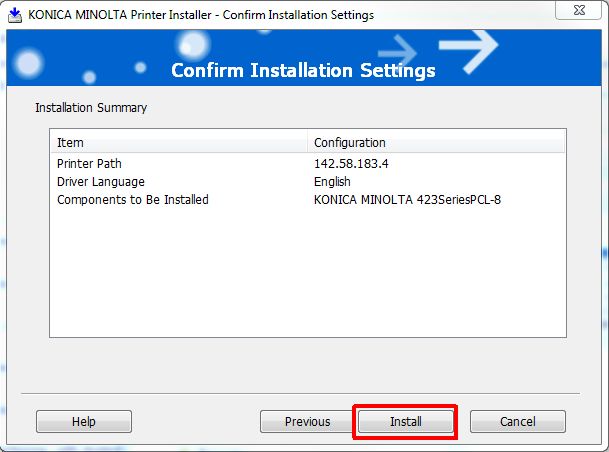
Click on Install.

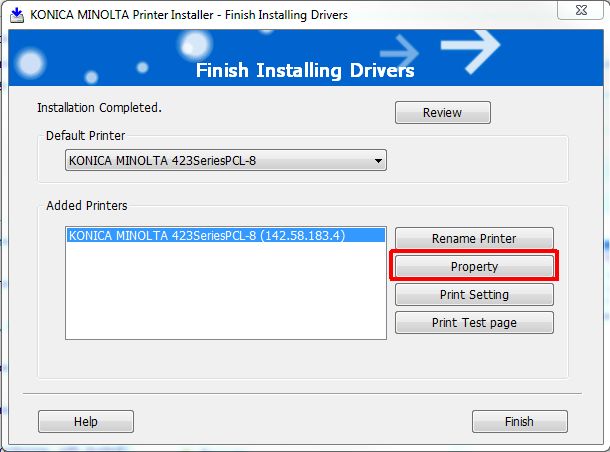
When the installation has completed, click on the Property button.

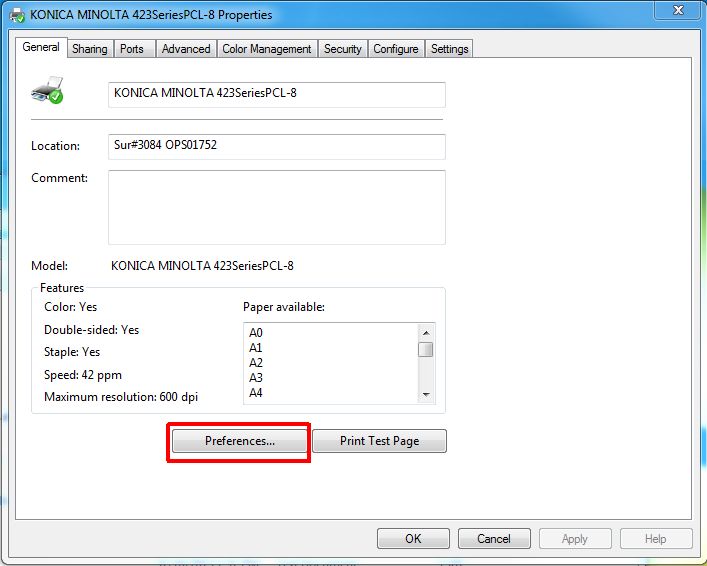
Click on Preferences....

On the Printing Preferences dialog, click on the Basic tab, then click on Authentication/Account Track....
On the User Authentication/Account Track dialog, enter your account tracking code in the Password field, then click on OK.
Click OK on the subsequent dialogs, and Finish on the last dialog.
On the User Authentication/Account Track dialog, enter your account tracking code in the Password field, then click on OK.
Click OK on the subsequent dialogs, and Finish on the last dialog.